- Table of Contents
- 1. Adding data
- 1.1. Creating a new scenery
- 1.1.1. Selection
- 1.1.2. Scene map and terrain textures
- 1.1.3. Height map
- 1.1.4. Registered location
- 1.1.5. Performance
- 1.1.6. FAQ
- 2. Ideas
- List of Tables
- 1-1. Locations
- List of Figures
- 1-1. Scene map
- 1-2. Height map source
- 1-3. Swap colors dialog
- 1-4. Levels dialog
- 1-5. First height map
Chapter 1. Adding data
1.1. Creating a new scenery
The goal: design a new scenery.
In order to present the way I use to do such a thing, I will present the job I do to create a scenery based on "La Reunion" island.
 | In order to edit SearchAndRescue scenery (scenery/*.scn) you could use ScnEdit. Personnaly, I prefer to directly edit the file by hand with a text editor. |
1.1.1. Selection
The most important is to select a place to render. This place should be interresting for missions.
So, why "La Reunion"?
It is small, so all the island could be rendered, which is interresting for the gamer: a complete environnment.
It's an island, so there is an ocean, ie a place for lot's of future search and rescue missions in sea.
It's a volcano island, whith moutains, ie another good place for lot's of future search and rescue missions.
I like this island, and would to play on it ;-).
1.1.2. Scene map and terrain textures
The first information to collect is a satellite/aerial photo.
Personnaly, I search such thing with the Google image search engine. A suggestion made to me was to look on http://www.mapquest.com/.

1.1.3. Height map
In order to render the height, I decide to use an height field (normal way for such job).
Looking for a correct heightfield map is hard part of the job. After a long search on Internet, I found a web site providing data with acceptable height resolution for SearchAndRescue data: Worldwide Airport Path Finder. The correponding data for La Réunion is shown in Figure 1-2.

The height resolution is acceptable as is for a game, but an height field must be a greyscale image. We have to convert this map to a greyscale one manually[1]. This job must be done with the Gimp application.
Simplify the map.
Remove the disclaimer messages in the sea ("not valid for navigation" and "fallingrain.com") and the airports location (here "FMEE" and "FMEP") with a pencil and a correct color.
Select the sea with the Selection Color.
Extend the selection by 1 pixel (in order to cover the black border).
Replace the selection by pure black: the easy way is to invertblck/white foreground/backgroung and press Ctrl-K. .
Reduce the map to the strict necessary. In my case (an island) I used the menu ->->.
Convert each color to a grey level.
Select a (foreground) color.

Open the color swap filter: ->->->

To avoid searching the dialog in the menu, it is possoble to re-call it with Shift-Alt-F after a first call.
Select a destination color where each component have the same value (ie: (0,0,0), (1,1,1), etc...). Take care that the (0,0,0) is the sea color. Select (1,1,1) for the coast, (2,2,2) for the color close to the coast and so on.
We have a greyscale map, but as is, the terrain is plane. We have to extend the grey level in order the sea keep a black color, but the highest point should be white (255,255,255).
Open the level dialog: ->->
Set the Input levels in order that our clearest grey begin the greatest value. Personnaly, I changed the 255 to 18 (I used 18 levels of grey).
Apply the changes.


Ok, we now have a great height map.
If we use it on SearchAndRescue we observe that the terrain is leveled with long stages. The reason is that the map is large (420x380) but the height resolution is poor. So, the map have lots of pixels representing the same altitude which is wrong.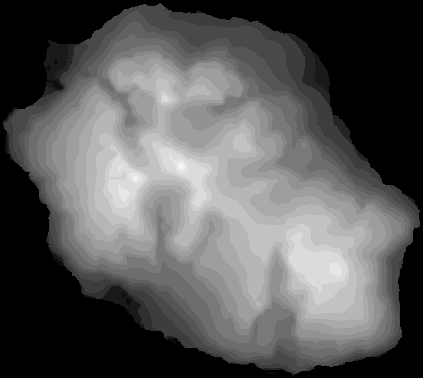
To correct this, we have two solutions:
Use the Terraform application. With it, we will be able to smooth the relief.
The second is simplier: scale down the map. Then, it is possible to use blur in order to smooth.
1.1.4. Registered location
Adding "Registered locations" seems to be a good way to learn the SearchAndRescue coordinate system. A simple location at (0,0,0) show that this position is the midle of my 0-translated island object.
Table 1-1. Locations
| Name | Map coord. | Translation |
|---|---|---|
| Whole map | 400x355 pixels | 0,0 |
| Cilaos | 158x180 | (-42,+3)*64800/400 |
| St Gilles les Bains | 10,126 | -190,-51 |
| Pierrefonds Airport | 133,307 | -67,+130=-10854,+21060 |
Once locations have been placed with this method, you can explore the whole map in Ctrl-A mode.
1.1.5. Performance
[Note that you should not use "one big object" to represent a huge area, since the way OpenGL prefers that you use smaller "tiled" objects for representing landscape. The scenery complexity increases CPU load and thus decreases performance, this is a common problem in games, and is the reason why data in most games are "approximated" and simplified.] (Tara Milana)
1.1.6. FAQ
1.1.6.1. What's wrong with my TGA images, I get the following message
Targa Library Warning:
    Filename:
/opt/game/sar/share/games/SearchAndRescue/textures/la_reunion/scene_la_reunion.tex
    Reason: Image data size 196634 less than header indicated size 196608.
Personnaly, I get this with Gimp 1.2.3. To correct, I used convert from the ImageMagick set. From Gimp, save the data in tmp.tga and then use the command convert tmp.tga tga:my_scene.tex.
This is the same for the heightfield image.
If you experienced better image manipulation program with TGA export, please let me know.
Chapter 2. Ideas
3D objects with multiples textures. The goal is to make some object from heightfield with more precise cities, road, rivers...
Tool to simplify the altitude search.
sar_find_alt [-relative | -gps | -lon_lat] file.scn x y
First release could simply return the z coordinate of all intersection with objects.